All posts by ezsoftware

usb ntfs drive mounting as read-only in Ubuntu

ntfs usb drive mounted on Ubuntu 16.04  but access is read-only

dmesg command shows:

[ 7841.139989] scsi 13:0:0:0: Direct-Access WD My Passport 25E1 1019 PQ: 0 ANSI: 6
[ 7841.140448] scsi 13:0:0:1: Enclosure WD SES Device 1019 PQ: 0 ANSI: 6
[ 7841.142162] sd 13:0:0:0: Attached scsi generic sg2 type 0
[ 7841.142458] ses 13:0:0:1: Attached Enclosure device
[ 7841.142691] ses 13:0:0:1: Attached scsi generic sg3 type 13
[ 7841.142771] sd 13:0:0:0: [sdb] Spinning up disk...
[ 7847.595418] .ready
[ 7847.595909] sd 13:0:0:0: [sdb] 1953458176 512-byte logical blocks: (1.00 TB/931 GiB)
[ 7847.596347] sd 13:0:0:0: [sdb] Write Protect is off
[ 7847.596356] sd 13:0:0:0: [sdb] Mode Sense: 47 00 10 08
[ 7847.596724] sd 13:0:0:0: [sdb] No Caching mode page found
[ 7847.596733] sd 13:0:0:0: [sdb] Assuming drive cache: write through
[ 7847.693638] sdb: sdb1
[ 7847.694887] sd 13:0:0:0: [sdb] Attached SCSI disk
[ 7848.180642] ntfs: volume version 3.1.

sudo apt install ntfs-3g

remount the usb and drive is accessible
pi service

Add a service file /lib/systemd/system/picam.service similar to this:

[Service]
WorkingDirectory=/home/pi/mydir
ExecStart=/usr/bin/python xxx.py
Restart=always
StandardOutput=syslog
StandardError=syslog
SyslogIdentifier=picam
User=pi
Group=pi
[Install]
WantedBy=multi-user.target

enable then start/stop using:

sudo systemctl enable picam.service 
sudo systemctl start picam.service 
sudo systemctl stop picam.service

to view the output:

 sudo journalctl -u picam.service

mount network usb (router) drive and share with raspberry pi

plug hard rive into router

In the router html interface

“Advanced”/”USB Port” share with samba   username=xxx  password=yyy   device = defaulted to usb1_1  directory = Router  rights=read+write

remember to enable Samba (tick box)

On network computer (pi)

sudo mkdir /mnt/Router (if it doesn’t exist)

sudo chown -R pi:pi /mnt/Router

sudo mount -t cifs -o username=xxx,password=yyy,uid=pi //192.168.sss.fff/xxx  /mnt/Router

BACKUP /etc/fstab to fstab.bak  THEN  sudo gedit /etc/fstab and add line :

//192.168.1.fff  /mnt/Router username=xxx,password=yyy,uid=pi,gid=pi 0 0

sudo mount -a   (to then run the fstab file) (add it to bottom of .bashrc file to automount as boot of fstab occurs before network available.

Installing a Windows XP VirtualBox on Ubuntu 14.04 with Guest Additions SHARE

sudo apt-get install virtualbox-qt (or whatever its called)

create a new virtual machine, insert windows DVD and install windows as a virtual machine

  1. in the virtual machine (i.e. windows) under  Devices  select  insert guest additions CD. Guest Additions appears in the windows taskbar.
  2. install the windows guest additions virtual CD by right clicking it.  Windows will restart when installed.
  3. Under windows machine->session information Guest Additions is shown with a version.
  4. On the HOST (Ubuntu) select a folder to share via the Virtual Box Manager Settings.
  5. REBOOT windows
  6. Under Computer (NOT Network) there should be a mapped drive available, e.g.   SharedFolder (\\vboxsrv) (E:)

There is NO NEED to install guest additions on Ubuntu from what I can tell (although I did that first so cannot be totally sure).  They are after all called GUEST additions.

To install the USB device:

On Ubuntu host command prompt

sudo usermod -G vboxusers -a <user>
REBOOT or log off Ubuntu to let change take effect.

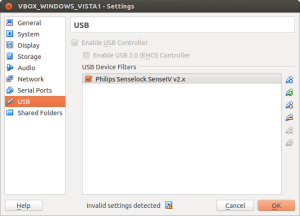
On the host it is best to create a usb filter for the usb device that needs adding so that Windows doesn’t try to use all usbs (can be problems with Windows suddenly getting/losing control of usb devices without shutting down correctly):
Screenshot from 2015-10-23 20:35:40

use lsusb command to get the information about the usb devices


Poor/intermittent wifi connection

By using internet speedtest under a variety of the settings the following was found (this may not hold true in the future but its what seemed to make sense at the time) :

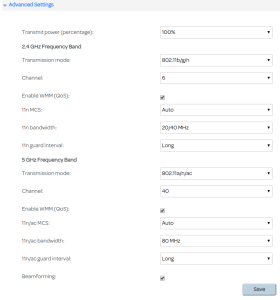
1 Wireless WMM (QoS)

Enabling QoS means that VOIP/videos/games take priority and can cause issues for web browsers when gaming is in progress.  Heavy gaming seems to even stop connection to the wireless network (at that time the specific game causing problems was DOTA 2).

Switching off QoS leaves all network connections the same access to the internet causing lag problems for game users/video watchers.

2 Channel

Channel (1,6,9,11 are supposedly best for less interference) Is significant with 6 significantly better on the 2.4GHz band  for our particular wifi network at the current time.  Wireless phones and microwave may interfere along with other local wifi networks.

Unsure of 5GHz band cos not sure what uses it, channels 36,40,44,48 recommended so stuck it at 40 (from 112)

3  Other settings had little or adverse effects

tried 40MHz,  20Mhz, 5GHz off

switching off various devices

moving all electrical items from around the router.

4  These are the current working settings :

Screenshot from 2015-01-31 19:54:47

GIMP – cutting out an object, fuzzy edges (or not fuzzy)

  1. Open image
  2. Right click the layer and Add Alpha Channel
  3. Get the Tools->Selection->Free Select lasso tool and click round the edge (just inside) of the object.
  4. Select->Feather (and an amount for feathering)
  5. Select->Invert (causes the background to be selected)
  6. Select->Clear

For a hard edged outline, instead of feathering the outline can be clicked round using the Select->Scissors tool and carefully clicking all round adding/moving the points as required.


DXF File from OS DEM Data (3 colour)

1 Open QGIS with OS DEM data loaded

2 QGIS->Raster->Extraction->Clipper  save area as new file (.tif)

3 QGIS new project, drag in the .tif

4 Select the tif (DEM) data and then QGIS->Raster->Extraction->Contours

5 Select the new contours file and right click Properties. Instead of Single Symbol select rule-based.  Load in the 3 colour contour rule.

6 Save as DXF (use correct scaling)